


Henna Brow Step-by-Step Process
DISCLAIMER:
As of February 25, 2022, the FDA released a statement that Henna is now only approved for hair dye and not for applications on the skin. Henna is no longer available at PLA until further notice due to this. If you'd like to read the full statement by the FDA, please head to its website here.
______
What’s the one thing you can get into shape without exercising? Your eyebrows. Henna Eyebrows grant you a temporary solution to fuller, sharper, gorgeous brows, and your clients could benefit from offering this service! This specialized treatment has also taken over Instagram with a whopping 1.1 million posts using #hennabrows. So, this is definitely a trend you’re going to want to hop on ASAP. Luckily for you, you’ve come to the right place to learn everything you need to know when it comes to perfecting the henna brow process and getting longer-lasting results.
Let’s get started!
What is Henna Brows?
Unfortunately, not everyone can be blessed with dark, full eyebrows - the truth is that those with full brows are in the minority. The rest of us NEED to color in our brows. Similar to eyelash extensions, henna brows allow you to “wake up with make-up” without having to fill in your eyebrows. Henna is a natural alternative to traditional brow coloring - the colorings and products you use to apply henna coloring are all-natural, and are typically sourced from cruelty-free, vegan sources. This means you’ll not be working with any ammonia, like some standard brow coloring.
How to Do Henna Brows
The following are step-by-step instructions on how to complete a Henna Service using the PLA Henna Product Line.
1. Clean Eyebrows
Henna Brows need to be done on clean, make-up free brows. Our PLA Brow Scrub helps cleanse the skin and remove excess oils, skin cells, and dirt from the eyebrows before applying henna. Scrubbing the eyebrows before applying henna also helps the client have a longer-lasting result! Be sure to use one of our lip applicators when using our brow scrub and cleanser.

Once you have finished scrubbing the brows, wipe it off with a tissue, cotton pad, or make-up pad. Then, use our PLA Sterile Cleanser to remove any leftover oils or brow scrub. Finally, apply some water on a tissue and gently wipe down the clean eyebrows.
2. Outline The Eyebrows
This step is crucial when doing henna brows; you need to make sure that the raw brows have a precise outline. Mapping out the shape of the eyebrow is needed in order to have a beautiful outcome. This will help you during the application process and create the perfect henna brow shape.
PLA now offers our White Henna Pencil that will guarantee you the perfect shape each and every time! Be sure to sharpen the pencil before outlining so you get a flawless outline. Then, use a micro brush, also available at PLA, to clean up any imperfections you made when outlining the eyebrows. Think of the micro brush as an eraser!

Another key tip is to have your client sit up once you are done outlining and then take a good look at your clients’ eyebrows to make sure they are even.
3. Mix Your Henna Color.
Mixing your Henna color will require you to have certain items:
- PLA Henna Color + Henna Scooper
- PLA Henna Activator
- PLA Ink Mixer
- PLA Dappen Dish
Begin by scooping 2 scoops of the Henna powder into your Dappen Dish. Make sure you don’t lose the top lid inside the Henna color; this little lid will ensure that your Henna powder stays fresh.
Next, mix in your PLA Henna Activator. We recommend starting with approximately 3-4 drops of the activator at room temperature with a ratio of 1:2. The Henna Activator works to stabilize the hair’s pH balance. It also aids in repairing the hair’s damaged porosity.
Then, use the Ink Mixer for about 30-45 seconds, or until you see the color become thick. It’s crucial to have your Henna mixed properly, creating the correct consistency to evenly apply to your client’s brows. Make sure you mix the Henna color away from the client since it might splash outside of the Dappen Dish.

4. Apply The Henna.
This is the fun part! Begin applying your Henna mixture to your client’s eyebrows with our PLA Henna Brush. We recommend starting at the tail of the eyebrow and making your way up to the front. Use a stroke motion to get the shape and go at a slower pace. Make sure you stay inside the white line and if you do happen to stray outside, quickly clean the Henna off with a micro brush.
Then, when you reach the arch of the eyebrow, use the brush to tap and press the mixture to make sure the color gets into the skin.
#PLAQuickTip: If you want to achieve ombre eyebrows, you can apply thinner layers on the top of the eyebrows.
5. Wrap The Eyebrows.
Once one of your eyebrows is completely filled in, use PLA Beauty Cling Wrap on top of the brow. This will keep the mixture moist and make the process faster. Once this step is completed, you can repeat the process onto the next eyebrow!
6. Processing Time Begins.
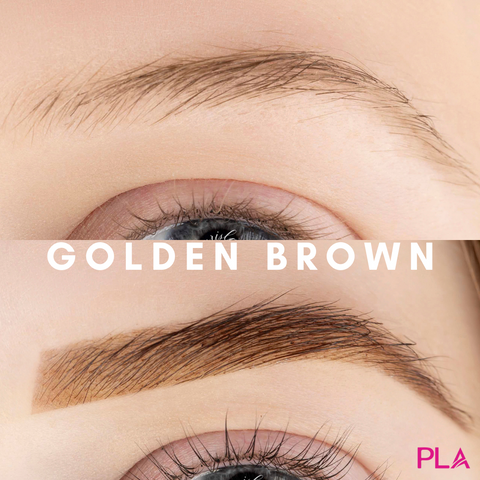
For darker brows, we recommend leaving the Henna color on for 10 minutes. For lighter colors, such as Golden Brown or Golden Blonde, you can leave the color on for up to 15 minutes; again, depending on if the client wants them lighter or darker.
7. Clean Off The Henna Color.
Once the timer goes off, this is your time to clean off the Henna color. You can use a wet paper towel and a brush (spoolie) to get the mixture to come out from the brow.The brush helps lift up the mixture so it’s easier to clean away the henna. Clean rubbing and scrubbing until the eyebrows are clean and smooth. And that’s it!
Optional: Apply More Henna Layers.
Once you have finished filling in both eyebrows, you have the option to apply two or three more layers to the brows, depending on how dark your client wants their brows.You may add two more drops of the activator and mix the mixture again. This will thin the mixture out to allow for an easier application. We suggest you wait 2-3 minutes between each layer before applying the second coat.
PLA Henna Brow Before and After
Here at Paris Lash Academy, we now offer six Henna Colors: Black, Dark Brown, Medium Brown, Light Brown, Golden Brown and Golden Blonde. Here are all our colors on models before and after getting Henna Brow services.


Henna Brow Aftercare
Now that you’ve completed your first Henna Brows, it’s important to inform your clients on brow aftercare. For 24 hours after getting Henna Brows, clients should avoid: touching their brows, using saunas/steam rooms, hot tubs, taking hot showers, swimming, applying makeup to the area, and using perfumed products.
How Long Do Henna Brows Last?
Henna Brows are a temporary solution to darker and fuller eyebrows. Similar to eyelash extensions, clients will need to return to get their brows “filled” every 6-8 weeks, depending on their skin type. We have seen oily clients have their brows fade as early as four weeks, but some client's brows last up to ten weeks!
Why Lash Artists Should Offer Henna Brows
Offering Henna Brows is a great way to build clientele and offer additional services to your clients! And it’s super easy!
Performing Henna Brows is extremely quick. Being a full-time Lash Artist can be extremely hard on your back, hands, and neck. Allow yourself to have some downtime (while also making money) by performing Henna Brows. Half of the treatment is just you waiting for the color to process! We highly recommend you take this extra service, it will benefit you in so many ways. At our PLA salons, we charge $90 for a Henna Brow service, which is a great way to make additional income.
PLA Henna Kit

PLA also offers a quick and easy Henna Kit that comes with absolutely everything you need for Henna Eyebrows. The kit also offers you the opportunity to try out the PLA Henna Line at a lower cost!
The PLA Henna Kit Contains:
- 6 PLA Henna Colors
- PLA Henna Activator
- PLA Brow Scrub
- Ink Mixer
- Dappen Dish
- Eyebrow Henna Brush
- White Pencil
- Sterile Cleanser
We hope this information helps you and encourages you to begin offering Henna services at your salon! Have additional questions? Don't hesitate to reach out to our team! For more information on how to perform Henna Brow services, check out our detailed YouTube video.


